Laboratory Activity #3 – Student Laboratory Packet
Diffusion Through a Membrane
A Laboratory Activity for the Living Environment
Part 1 –Diffusion Through a Membrane
Molecules are constantly moving. They move in straight lines unless they are deflected by other molecules or obstacles in their environment. Diffusion is the process by which the collisions between molecules cause them to continually spread apart from each other. Their overall movement can therefore be described as movement from an area of greater concentration to an area of lower concentration. Diffusion continues until the molecules are equally distributed, that is, their concentration is equal throughout the area that contains them. At this point, the molecules continue to move and collide, but their concentration remains the same throughout the area of containment.
When certain molecules encounter artificial membranes with pores, they may be able to pass through. If the molecules are small enough to pass through the pores, their movements eventually will cause the concentration of these molecules inside and outside of the membrane to equalize.
Living cells are surrounded by a membrane that acts as a selective barrier between the contents of the cell and its environment. The membrane is selectively permeable; it allows some molecules and other particles to enter and exit while blocking others. Even small molecules that could ordinarily pass through may be blocked. There permeability of the membrane can change depending on changes in the internal or external environment of the cell.
As a part of this activity, you will build a model cell using an artificial membrane. Remember that this membrane is only model. Unlike a cell membrane, it will always have the same permeability to dissolved substances. Small molecules and water will be able to pass through easily while larger molecules will not.
Objectives:
By the end of this activity, you should be able to:
• Demonstrate how to test for simple sugars and starch
using chemical indicators
• Explain diffusion through a membrane
• Describe the permeability of a model membrane for glucose, starch, and
Starch Indicator Solution
Important Note: Record all of your data and answers on these laboratory sheets. You will need to keep them for review before the Regents Examination. You will also need to transfer your answers to a separate Student Answer Packet, which your teacher will use in grading your work. The school will retain that packet as evidence of your completion of the laboratory requirement for the Living Environment Regents Examination.
Materials
| • Dialysis tubing or plastics bags • String or unwaxed dental floss • Glucose Indicator Solution • Test tube rack • Concentrated glucose solution • Funnel • Tap water • 7 test tubes |
• Starch solution • Paper towels • Droppers or pipettes • Safety goggles (1 pair per student) • Starch Indicator Solution • 250 mL beaker • hot water bath (for class or several groups) • test tube holder |
Safety
• Avoid all direct contact with laboratory chemicals.
The Glucose Indicator Solution is corrosive, and the Starch Indicator Solution
will stain.
• Do not eat or drink in the laboratory.
• Wash your hands and work area when the laboratory is completed.
• Be careful when using the hot water bath to avoid burns.
• Wear goggles whenever someone in your laboratory is using glassware
or chemicals.
Procedures: Make a “Cell”
1. Take a 20 cm length of dialysis tugging and soak in warm
tap water for a few minutes. You should then be able to pull the ends apart
gently, forming it into a tube. Rubbing the ends of the tubing between your
fingers under water is sometimes helpful when attempting to open the tube.
2. Seal one end of the tube by folding the end over and tying it closed with
a piece of string or dental floss. The goal is to make that end completely leak-proof.
3. Pour glucose solution into the tube until it is about ¼ full. Next,
add enough starch solution to fill the tube about halfway. You can use a funnel
to make this easier.
4. Tie off the top of the tube in the same way you tied off the bottom. The
tube should not leak from either end. Gently mix the contents of the tube by
turning it upside down and back again. Check for leaks.
5. Rinse off the “cell” you’ve just made by holding it under
running water.
6. Place the “cell” in a breaker and add water until the “cell”
is just covered
7. Add Starch Indicator Solution (containing iodine) to the water in the beaker.
Add enough to make the water an ember color.
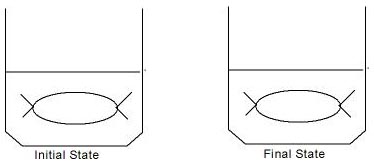
8. Label the “Initial State” part of the diagram found on page 4.
Indicate the contents and color of the beaker and cell
9. Based on your knowledge of diffusion, predict what will happen to the substances
inside and outside of the “cell. Record your prediction here:
10. Set the beaker aside while performing the chemical tests described in the next section of this investigation. Leave it undisturbed for least 20 minutes.
Chemical Testing
Table One – Chemical Test Procedures
| When Testing a Sample with | Follow This Procedure: |
| Starch Indicator Solution | • Place 10 drops of the substance to be tested in
a clean test tube • Add 10 drops of Starch Indicator Solution • Carefully mix the contents of the tube • Observe any color change • Record results |
| Glucose Indicator Solution | • Place 10 drops of the substance to be tested in
a clean test tube • Add 10 drops of Glucose Indicator Solution • Heat in a hot water bath for two minutes • Observe any color change • Record results |
Procedure
• Obtain 6 clean test tubes and use them when testing
samples of distilled water, starch, and glucose with each of the two indicator
solutions. Follow the procedures described in Table One.
• Record you results in Table Two below: Enter the color observed in the
test tube after each test is completed.
Table Two – Chemical Test Results
Indicator Solution
Used |
Material Tested |
||
Distilled Water |
Starch |
Glucose |
|
| Blue-colored Glucose Indicator Solution | |||
| Amber-colored Starch Indicator Solution | |||
What test would you need to perform to prove that it is the combination of glucose
and the Glucose Indicator Solution that changes color when heated and not just
the glucose or the Glucose Indicator Solution alone? Support your answer with
an explanation.
Model Cell Observations
• Carefully examine the “cell” and beaker
you put aside earlier.
• Record any changes, including color changes, you observe in the “cell”
and in the beaker.
• Use a pipette to transfer 10 drops of the solution in the beaker (outside
the “cell”) to a clean test tube. Test it with Glucose Indicator
Solution. Did a color change occur? _________Is this test result positive or
negative?___________.
• Label the contents and note the colors present in both the beaker and
the cell of the “Final State” diagram below:
|
• Clean up according to the directions given by your teacher.
Questions:
1. What is the best explanation for the color change that occurred inside the “cell”?
2. Did any starch diffuse out of the “cell”? Explain how you can
tell.
3. Did any glucose diffuse out of the “cell”? Explain how you can
tell.
4. Which substance(s) diffused through the membrane?
5. Which substance(s) did not diffuse through the membrane?
6. Explain why some substances were able to pass through the membrane while
others were not able to.
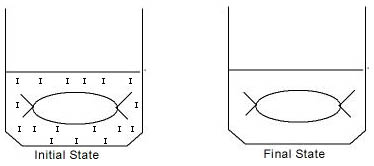
7. In the “initial State” diagram below; Starch Indicator Solution
is indicated with the lett “I” because it contains iodine. Using
the letters “S” for starch and “G” for glucose, indicate
the areas where each of these molecules are located in both diagrams. Be sure
you indicate the location of iodine molecules in the “Final State”
diagram too.
 |
Part 2 – Diffusion of Water Across a Membrane (Osmosis)
Osmosis is a special type of diffusion. Specifically, it is the diffusion of water across a membrane. Osmosis is a very important process because it enables cells to maintain the proper water balance. Generally water will diffuse across a membrane, resulting in equal concentrations of water on both sides. If the cytoplasm of a cell is 95% water, the remaining 5% is dissolved materials (solute). If the liquid that surrounds the cell has the same concentration of water as the cytoplasm, no net diffusion occurs in either direction. In other words, equal numbers of water molecules move into and out of the cell. If the liquid outside the cell has a higher concentration of water (less solute) than the cytoplasm, water will diffuse into the cell. If the liquid outside the cell has a lower concentration of water (more solute) than the cytoplasm, water will diffuse out of the cell. In this activity, you will place living cells in different solutions and observe the results.
Objectives
By the end of this activity, you should be able to:
• Predict what would happen if cells are placed in solutions
having different concentrations
• Explain how the diffusion of water plays a role in several real-world
situations
• Prepare wet-mount slides and use appropriate staining techniques
• Make observations of biological processes
Materials
• Red onion |
• Salt solution • If the salt solution in not provided: o Triple-beam or electronic balance o 10mL graduated cylinder o salt o beaker |
Safety
• Do not eat or drink in the laboratory.
• Wash your hands and work area when the laboratory is completed.
• Handle slides and cover slips with care.
Procedures:
1. If the salt solution is not provided by your teacher, use
a balance to measure 1 gram of salt. Measure 10mL of distilled water with a
graduated cylinder. Add both the salt and the water to a 150mL beaker and mix.
This will be your prepared salt solution.
2. Your teacher will provide a small, curved section of an onion for you to
use. Break the section in the middle and gently peel off the reddish outer membrane.
3. Position the membrane in a drop of water on a slide. Be careful not to allow
the membrane to fold over on itself.
4. Add a cover slip and observe the cells using the low power of a microscope.
Choose the magnification that will allow you to see individual cells and their
contents. If you do not see any cells with red coloration, search on the slide
for cells that do have it. You may need to make another slide.
5. Have your teacher observe your slide with the microscope to be sure you have
a good preparation.
6. Based on your observations, draw and color a typical red onion cell mounted
in water. Label the cell wall, cell membrane, and cytoplasm.
 |
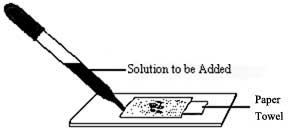
7. Next, without disturbing the slide, add salt solution. You can do this by placing a small piece of paper towel against one edge of the cover slip and adding several drops of the salt solution to the other side. (See diagram below). The paper towel will soak up the liquid already on the slide and draw the salt solution through. Remove the paper towel before it soaks up too much liquid and dries out the slide.
 |
8. Observe the cells for several minutes. You should see a change in the cells from your previous observation. If not, add more salt solution. Describe the changes you observed in the red onion cells.
9. Have your teacher check your slide with the microscope to be sure you are able to observe the effects of salt on cells.
10. Based on your observations, draw and color a typical red onion cell mounted
in salt solution. Label the cell wall, cell membrane, and cytoplasm.
|
11. Describe what happens to the water content of the red onion cells when they are placed in a salt solution.
12. Replace the salt solution with distilled water. Use the same technique you
used in Step 7, but use distilled water instead of salt solution. It may require
20 or more drops to wash all the salt away.
13. Observe the cells for several minutes. Describe the changes that occurred
in the red onion cells.
14. Have your teacher check you slide with the microscope to be sure the effects
of distilled water are visible.
15. Based on your observations, draw and color a typical red onion cell mounted
in distilled water.
|
Analysis Questions
1. During Part 1 of this laboratory activity, one group of students followed
the directions incorrectly. They poured the Starch Indicator Solution into the
“cell” and filled the beaker with starch and glucose solution. State
how their results would differ from those obtained by students in their class
who followed the directions correctly.
2. Some state roads are salted heavily in the winter, creating an environment
problem. Based on observations you made in this laboratory activity, explain
how organisms could be harmed by high levels of salt from roadways.
3. When a person in the hospital is given fluid intravenously (an I.V.), the
fluid is typically a saline (salt) solution with about the same water concentration
as human body tissues. Explain how the use of distilled water in place of this
saline solution would be expected to upset the patient’s homeostasis.
Your answer should refer to the process of diffusion.
4. Many fresh-water one-celled organisms have structures called contractile
vacuoles. These structures collect and pump out excess water that accumulates
in the cell. Name the process that causes water to flow into these organisms._________________Expain
why contractile vacuoles would be of little value to one-celled organisms living
in the ocean (salt water).
5. Popcorn sold at most movie theaters is very salty, causing people to become
thirsty and buy soft drinks. Describe in scientific terms why the salty popcorn
causes this thirst. You should mention changes in specific body cells in your
answer.
6. In many animals, glucose, rather than starch, is transported by the blood
through the body to all the cells. Starches in many foods are digested to yield
glucose. Based on what you learned in this laboratory activity, explain why
the digestion of starch to glucose is necessary.